- Products
APPLICATIONS
 Record, organize, search and share your scientific data
 Streamline organizing, tracking and ordering lab inventory
 Manage and schedule lab equipment and resources
 Secure, compliant, government-approved solution
PRODUCTS
SOLUTIONS
- Enterprise
- Pricing
- Contact
Quick Start Guide for Inventory
Short introduction to the basics of Inventory for lab members and administrators
FOR LAB MEMBERS
Access LabArchives Inventory
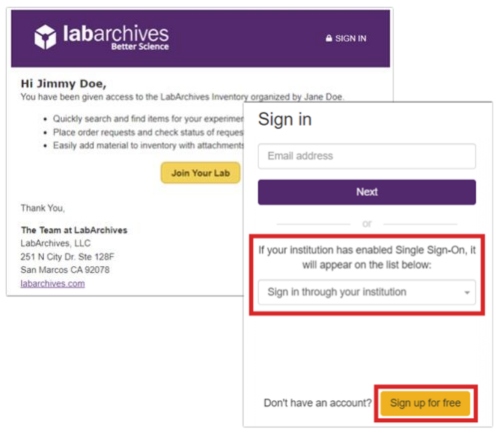
Lab Members will receive an invite from the Inventory Lab Manager. Click "Join Your Lab" to activate your account and access the Lab.
- Access Inventory from one of our regional servers:
- If your institution has enabled Single Sign-On, select it from the Sign in through your institution list.
If you would like to create a free account, click Sign up for Free.
Find Items
There are several ways to find the item you are looking for in LabArchives Inventory.
Inventory filters
On the left-hand side, select filters for Inventory Type, Location and more.
Sorting items
Click the column headers to sort by Name, Inventory Type and more.
Searching items
At the top of the Inventory list, you can search for an item. Use the Advanced Search to set up more complex searches or save a frequently used search.
Scan QR code
If you print QR Codes or labels for your items these can be scanned using the camera button.

Use Items
Once you find the item you are looking for, you can review item details from the “About” and “Details” tab. On the “Labels” tab you can download or print the Label for the item. Click “Use Now” to update the quantity. You can also place an order request or edit an item.
Use
Click “Use” to record the quantity of the item that you’ve used.
Copy
Click “Copy” to copy information from the “About” and “Details” tab. You can paste these details into documents or a LabArchives notebook, including an enduring link to the item.
Duplicate
For items like aliquots, choose “Duplicate” to copy the details to create a new item.
Reorder
If the item's quantity is low, you can place an order request.
Edit
If you have editing rights to the item, you can edit or update the item.

Integrate with LabArchives ELN
In your Notebook, use the “Inventory List” entry type to link to your Inventory Lab.
- When editing the Inventory List entry type, you can search your Inventory Lab and click “Use Now” to use the item and deduct the quantity used.
- Details like Location, Catalog #, Lot # and Expiration will be displayed in your Notebook.
- For items that are not tracked in Inventory, e.g. glassware, select the option “Manually add an inventory item to the list.”
- The integration provides bi-directional links from the Notebook to Inventory including a link in Inventory that tracks the use of an item in experiments logged in Notebook.

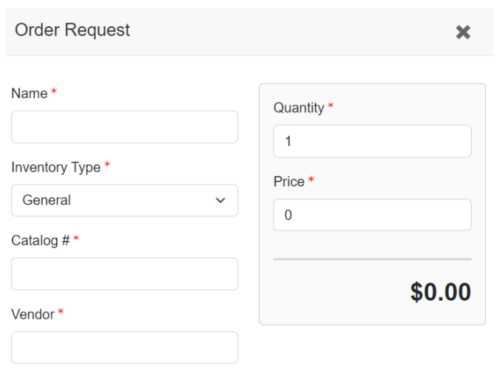
Request Orders
If quantities are running low and you need a certain item to be purchased, you can submit an order request. The Lab Manager (or other users with order approval rights) can approve or deny the order request.
- Select “Reorder” from the Inventory list or while viewing an individual Inventory Item.
- Check your notifications to be updated about any pending order request.
- Lab Members can receive their own orders.

FOR LAB MANAGERS
Inventory Types
Click the Gear icon to access Lab Management. By default, there will be nine available inventory types. Each type can have custom attributes or fields to describe the item, in addition to the standard fields available for all inventory items
- To edit an existing Inventory type, click the pencil icon and create or edit the fields.
- Tip: Assign a color to help clearly distinguish between different inventory items.
You can customize existing types or create your own.

Customize Storage Locations
On the Storage tab, set up the various locations where items can be stored.
- To create a new storage location, click +New Location.
- Click the pencil icon to add sublocations like Rack, Shelf, or Drawer.
- If you have freezer boxes, select the freezer box option, and input the size of the box.
- Tip: Consider how much detail your team needs to efficiently find an item.

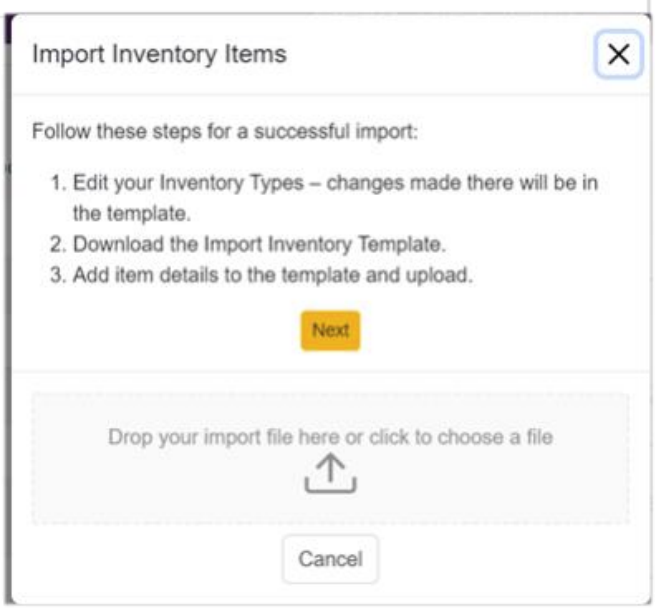
Adding Items
To upload multiple inventory items at a time, on the main Inventory display page click “Import Items” to download the CSV template.
- Each inventory type will be a tab in the template. Each column represents the default and custom fields, and each row will contain an item that you wish to create.
- Input any of the items that you would like to add to LabArchives Inventory.
- Note: If you already have your inventory managed in a CSV file or Excel document, you can copy and paste the details into each column.
- Once the file is ready, return to LabArchives Inventory and upload the import file.
- Alternatively, you can use “Add Item to Inventory” to add items individually.
Inviting Lab Members
To manage access to your lab, click the Gear icon to access Lab Management.
- Select the “Users” tab and click +Invite Users to invite your colleagues to access your inventory.
- On the “Roles” tab you can create custom roles for members of your team. For example, if an intern should have the ability to use items but should not place orders you can create a role called “Interns” and assign all interns to this role.

Find and Use Items
There are several ways to find the item you are looking for in LabArchives Inventory. Once you find the item, click “Use Now” to update the quantity. You can also reorder an item or edit an item.
Inventory filters
On the left-hand side, select filters for Inventory Type, Location and more.
Sorting items
Click the column headers to sort by Name, Inventory type and more.
Searching items
At the top of the inventory list, you can use the Advanced Search for more complex searches or save a frequently used search.
Scan QR code
If you print QR Codes or labels for your items, these can be scanned using the camera button.

Ordering
Order request
When an item needs to be purchased or the quantity is low, the Lab Managers or Lab Members with the appropriate permissions can request an item.
Order approve or cancel
The request can be approved or canceled by the Lab Manager.
Order placed
When ready, the order can be marked as ‘Ordered’ to indicate that the order is placed.
Order received
Once the item has been received, the order can be updated, and the item is created in LabArchives Inventory.
Reports
Lab Managers have access to the Reports tab to track additional details about their Lab and inventory items.

Expiration report
Track upcoming expiration dates for inventory items expiring within 30 days, 60 days, or 90 days.
Low quantity report
Report on inventory items that have met the low quantity threshold required for reorder notification.
Orders report
View a summary of all inventory orders placed in the Lab.
Freezer capacity
Create a report with details of the capacity of freezer box locations.
Additional Help and Support
- Find help through the Information icon within LabArchives Inventory
- Visit the knowledge base to browse by support topic
- Watch video tutorials
- Submit a question to our support team
- Register for one of our weekly webinars to attend a live training session
Recommended Resources

VIDEO SERIESGetting Started - Inventory Onboarding Series
Watch this video series to learn how to easily get started with LabArchives Inventory

WEBINARIntro to Inventory Webinar
Training session covering customizing and managing inventory, and ordering options

WEBINARIntro to Inventory On Demand
Recording of the live Intro to Inventory webinar covering set up and main features

GUIDEQuick Start Guide for ELN
Short introduction to the basics of LabArchives ELN including recording, editing and sharing data
Get started with LabArchives today
Start for free and upgrade as your team grows