- Products
APPLICATIONS
 Record, organize, search and share your scientific data
 Streamline organizing, tracking and ordering lab inventory
 Manage and schedule lab equipment and resources
 Secure, compliant, government-approved solution
PRODUCTS
SOLUTIONS
- Enterprise
- Pricing
- Contact
Quick Start Guide for Scheduler
Short introduction to the basics of LabArchives Scheduler for users and administrators
FOR USERS
LabArchives Scheduler is a calendar and scheduling service for the management and scheduling of resources – from desks to lab space or from microscopes to flow cytometers; if you have a resource that you need to manage access to, Scheduler provides an easy and customizable solution for your team.
Accepting your Scheduler Invite
Your Application Administrator will invite you to Scheduler. To accept the invitation, click on the link in the invitation email. Please note that the invitation is specific to a single user and cannot be reused by other members.
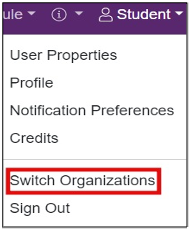
If your institution has an Enterprise License to Scheduler, it is possible that multiple organizations have been created and are being used across different teams. Please click on your name in the top right-hand corner of the purple navigation bar and select ‘Switch Organizations’ from the dropdown menu. Once you have accepted an invite to your organization in Scheduler you can login via scheduler.labarchives.com to begin making reservations to use the resources.
When is the Resource Available?
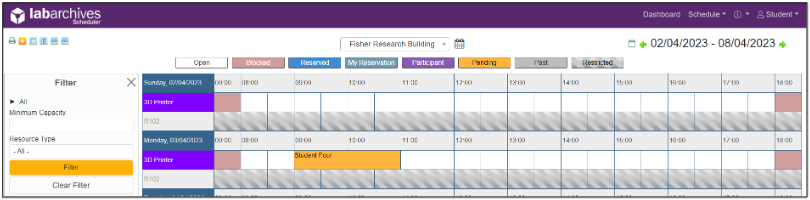
To find out when a resource is available, select ‘Schedule’ on the top navigation bar.
Bookings and the Resource Calendar show all resources that you have access to and any reservations that have been made.
My Calendar shows all reservations that you have created or that you have been invited to.
Find a Time allows you to filter on the resources, time, and availability to find the best time for you to create the reservation. As an example, you may want to see a list of all microscopes that are available tomorrow for more than two hours.
- To create a new reservation at a specific time, select the time that you would like to use the resource.
- To view more information about a reservation or to edit an existing reservation, click on the reservation.
How do I Create a Reservation?
Once you select a time and resource that you want to use, you will be brought to the ‘New Reservation’ page.
- Date and Time - You must set a time for the reservation, and you can set the reservation to repeat.
- Describe the Reservation - You may want to add a title or description for the reservation. You can also upload a file.
- Invite Others - There are two ways to add users to your reservation; you can add them as a participant or invitee. If other users are using the same resource, you may want to add them as a participant. However, if you add someone as an invitee, Scheduler will send them an invitation and give the user an option to Accept or Decline the invitation to your reservation.
- Click ‘Create’ to save your reservation.
If your application Administrator has required that all Users check in prior to the start of a reservation and check out of a reservation when it is complete, that can be done from this screen after your reservations are made.

FOR ADMINISTRATORS
Getting Started
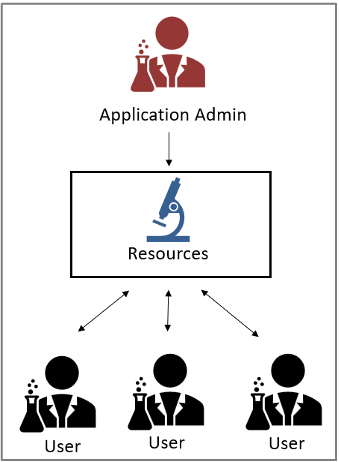
The first person to create an account at scheduler.labarchives.com has full administrative rights and takes on the role of Application Administrator for the Scheduler Organization. The Application Administrator can create Resources, invite others, and manage Reservations. All the key functionality needed to set up LabArchives Scheduler can be found by clicking ‘Application Management’ on the purple navigation bar at the top of the page.
To help you quickly navigate through Scheduler and understand how it functions, keep this in mind: In Scheduler, you create Reservations for Resources that are on a Schedule and Users are invited to an Organization.
- Resources: A piece of equipment, a meeting room, or tool that you can reserve.
- Reservation: A designated time that you or other people will be using a resource.
- Schedules: Time that you can select to book a reservation.
- Organization: An individual group in Scheduler that often represents a research team, lab, department, office location, or an entire institution.
- Scheduler Users are invited to an Organization in order to be able to view the Schedule and Reserve a Resource.
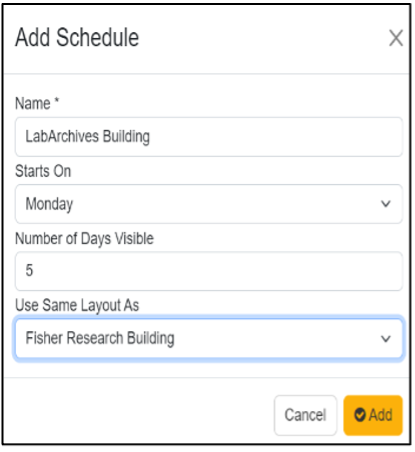
Create Schedules
The default Schedule in your Organization is available 7 days a week from 8am-6pm, which you can edit and rename if you wish to. If you would like to create an additional Schedule, please follow the steps below.
- To set up the Schedules, click ‘Application management’ and select ‘Schedules’.
- You can click on the green ‘Add Schedules’ icon on the right-hand side.
- Here you can set the name of your Schedule, how many days the Schedule operates for and what day of the week you want the Schedule to start from.
- Once the Schedule is created you can edit any information by clicking on the pencil icon.
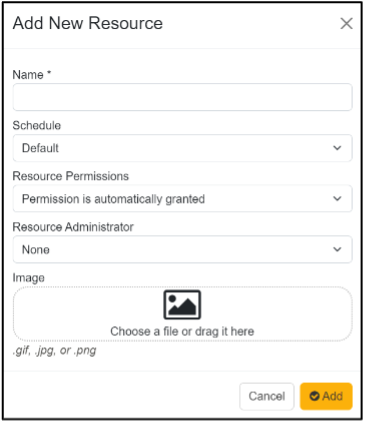
Add Resources
To set up the Resources, click ‘Application Management’ from the purple navigation bar and select ‘Resources.’
- Click on the ‘Add Resource’ link on the right side of the page.
- Unless you have set up a new Schedule for your organization, the Resource by default will be available 7 days a week from 8am-6pm. Other members of your team will be able to reserve the equipment without requesting permission. If you wish to change any of these settings click on the dropdowns.
- Click ‘Add’ to save the Resource. Repeat these steps for each resource.
- If you would like to add multiple Resources, you can click on the small triple dot icon and select Import Resources and follow the steps on screen.
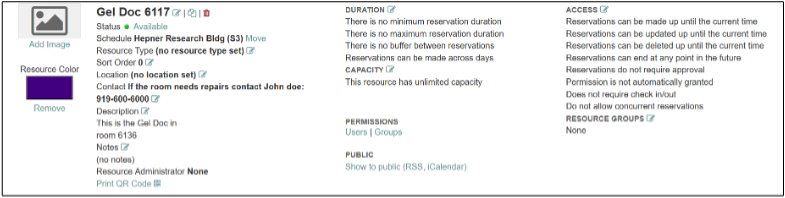
- From the list of Resources, you can add additional information or adjust the settings for each Resource including the duration, permissions, and access.
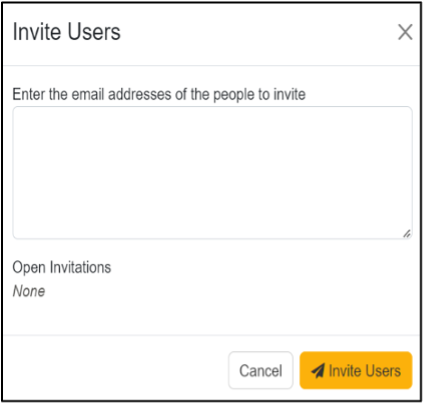
Invite Users
To share your Resources with other people you will need to invite them to your Organization.
- To invite others to Scheduler, click ‘Application Management’ and select ‘Users.’
- Click the triple dot menu on the top right and select ‘Invite User.’ You can invite one or multiple people.
- Each User that you invite will receive an email prompting them to login (they will create an account if they don’t have one). By default, a User will be able to reserve any Resources that have been set up by the Application Administrator. However, they will not be able to create new Resources or invite others to reserve equipment.
- From the list of Users, you can view those that are Active or Inactive in the Organization.
- From the ‘Actions’ column, you can remove Users from having access to certain Resources, change the permissions that they have, or view the Reservations that they have created.
Create Reservations
To create a new Reservation, you must find a Resource that is available for a specific time.
- To view a calendar showing all Resources, click ‘Schedule’ and select ‘Bookings.’
- To search for a time when a Resource might be available, click ‘Schedule’ and select ‘Find a time.’
- To create a Reservation, select the time and Resource that you would like to use.
- On the New Reservations screen, add more information about your Reservation and click ‘Create.’

Manage Resources and Reservations
Blackout Times
- If a Resource is going to be unavailable (for maintenance, cleaning, calibration, etc.) you can set up a Blackout Time.
- To create a Blackout Time, click ‘Application Management’ and select ‘Blackout Times.’
Announcements
- An Announcement will be available on the ‘Dashboards’ page and is a great way to notify your team about important information.
- To create an Announcement, click ‘Application Management’ and select ‘Announcements.’
Reports
- You can review all Reservations made by your Users or run reports on usage.
- To create a Report, click ‘Reports’ and select ‘Create New Report.’

Application Configuration
Application Administrators will find several settings available to them through the gear icon from the purple navigation bar. Click on this icon to reveal a dropdown menu, which includes Application Configuration. The Application Configuration settings allow Application Administrators to adjust additional settings for their Organization such as time zone, language, privacy settings, reminder emails, and credits.

Additional Help and Support
- Find help through the Information icon within LabArchives Scheduler
- Visit the knowledge base to browse by support topic
- Watch video tutorials
- Submit a question to our support team
- Register for one of our weekly webinars to attend a live training session
Recommended Resources

VIDEO SERIESGetting Started - Scheduler Onboarding Series
Watch this video series to learn how to easily get started with LabArchives Scheduler

WEBINARIntro to Scheduler Webinar
Training session covering uploading resources, setting rules, inviting users, and making reservations

WEBINARIntro to Scheduler On Demand
Recording of the live Intro to Scheduler webinar covering set up and main features

ALL EDITIONSQuick Start Guide for ELN New Users
Short introduction to the basics of LabArchives ELN including recording, editing and sharing data
Get started with LabArchives today
Start for free and upgrade as your team grows